You are here: Building the Model: General Elements > Locations > Location Graphics > Conveyors
A conveyor is a location that simulates the movement of entities on either an accumulating or non-accumulating conveyor and appears with a conveyor graphic. Entities can only enter a conveyor at the beginning and leave at the end. For accumulating conveyors, if the lead entity is unable to exit the conveyor, trailing entities queue up behind it. For non-accumulating conveyors, if the lead entity comes to a stop, the conveyor and all other entities stop. Entities on a conveyor may not be preempted by other entities.
The capacity assigned to a conveyor limits the number of entities that can access a conveyor. However, the cumulative total length or width of the entities on the conveyor cannot exceed the conveyor length. In fact, the utilization statistics for a conveyor reflect the amount of space utilized on the conveyor throughout the simulation, not the number of entities occupying the conveyor. Unlike other locations, an entity is not routed to the conveyor until there is room at the beginning for the entity to fit, even if the conveyor has capacity to hold it.
ProModel executes operation logic for entities entering a conveyor as soon as they enter unless the logic follows a MOVE statement. If no MOVE statement is encountered, entities begin their move on the conveyor after processing any logic. If a MOVE statement is encountered, entity movement is initiated. Any logic defined after a MOVE statement is processed when the entity reaches the very end of the conveyor.
Move time on a conveyor is based on the length and speed of the conveyor, as well as the length or width of the entity. The move time for an entity on a conveyor is calculated using the following formula:
Time = (Conveyor Length - Entity Length or Width)/Conveyor Speed
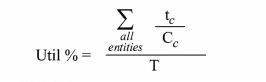
And the percentage utilization is calculated using this formula:
Where:
tc = the time the entity spent on the conveyor whether moving or not
Cc = the conveyor capacity for that entity
T = the total simulation time
Please note
Unlike queues, MOVE statements for conveyors may not include a move time. Processing logic executed at the end of the conveyor may contain any operation statement except for CREATE, SPLIT AS, UNGROUP, or UNLOAD. Additionally, the ACCUM, COMBINE, and GROUP statements are not allowed at the end of non-accumulating conveyors.
Due to the space limitations of a conveyor, certain operation statements at the beginning of a conveyor are invalid including ACCUM, COMBINE, CREATE, GROUP, SPLIT AS, UNGROUP, and UNLOAD.
The default conveyor length is determined by the graphic scale, although this may be overridden by entering a different length. When a conveyor is modified graphically, the length will automatically be recalculated based on the graphic scale unless you uncheck the "Recalculate path lengths when adjusted" option. You can access this option from the Tools menu under Options.
When you use conveyors and want the graphics to display properly on the conveyor with no overlapping and little space between entities, use the following:
|
Entity Orientation on Conveyor |
Requirements |
|
Width-wise |
1. Entity width on conveyor should equal horizontal dimension. |
|
|
2. Entity length on conveyor should equal vertical dimension. |
|
Length-wise |
1. Entity width on conveyor should equal vertical dimension. |
|
|
2. Entity length on conveyor should equal horizontal dimension. |
The animation of entities traveling along conveyors is displayed according to the logical length or width of the entity, not the scaled length or width of the entity graphic.
How to define a conveyor graphically:
1. Select the conveyor/queue symbol from the Location Graphics window.
2. Click on the Layout window with the left mouse button where the conveyor should start.
3. Add bends to the conveyor by moving the mouse and clicking the left mouse button.
4. Move the mouse in the desired direction and click on the right mouse button to end the conveyor.
How to create bends in an existing conveyor:
1. Click on the conveyor with the right mouse button. From the menu that appears, select Add Joint. A small black square appears on the conveyor.
2. Using the left mouse button, drag the square in the direction you desire to bend.
The conveyor options dialog box is used to define the specifications for a conveyor. To access the conveyor options dialog box, you may double click on a conveyor, select the conveyor and click on the Edit button from the Location Graphics window, or right-click on the conveyor and select edit. This opens the Conveyor/Queue dialog box from which the Conveyor Options dialog box can be opened by clicking on the Conveyor Options button. The Conveyor Options dialog box presents the following options:
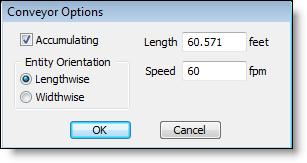
Accumulating Select or deselect this option depending on whether the conveyor is to be accumulating or non-accumulating.
Entity Orientation Select Lengthwise or Width-wise depending on whether the entity is traveling on the conveyor in the direction of the entity length or in the direction of the width.
Length The length of the conveyor expressed in either feet or meters depending on the default specified in the General Information dialog.
Speed The speed of the conveyor in feet or meters per minute. The distance units can be set in the General Information dialog box.